AdMob | Android
Getting Started with Android Integration
- Step 1: Creating an InMobi Account
- Step 2: Registering your App
- Step 3: Creating Placement Ids (this is InMobi's version of ad-unit id)
- Step 4: Filling out the Payout Information
- Step 5: Configuring InMobi as an Ad Source on AdMob’s Dashboard
- Step 6: Integrating InMobi SDK via AdMob Adapter
- Step 7: Testing the Integration
- Step 8: Advanced
Step 1: Creating an InMobi Account
To set up an InMobi account:
- Sign up as a publisher.
- Complete the e-mail verification for your account.
Step 2: Registering your App
- Click Add an App, and then click the link as shown below.
- Name your app, and then select your platform and proceed.
-
Read the condition about properties directed to children below 13 years, and then select the check box if it applies to you.
Note: For apps without a URL, the test mode is enabled by default. Once live, you can click the link to enter the URL on the dashboard as shown below.
Your app is ready to monetize.
Step 3: Creating Placement Ids
Placement Ids are InMobi’s terminology for AdMob’s ad-unit ids. For example, if you are trying to monetize a banner ad unit via InMobi network, you need to create a placement id of type “Banner”.
Refer the following table for successful monetization.
AdMob Ad Unit Type | InMobi Placement Type |
Banner | Banner |
Interstitial | Interstitial |
Rewarded Interstitial | Rewarded Video |
Native | Native Content |
-
Select the relevant ad format to define the placement of your ad.
-
Tag the placement for superior monetization, based on the ad unit’s location and context in the app.
Step 4: Filling out the Payout Information
Create, verify and activate your payment profile to make your earning tangible. InMobi follows a payout cycle of 60 days. This means that your earnings for a given month will be credited to you at the end of the 60-day payout cycle. You have the option of receiving your payouts via PayPal or wire transfer/RTGS.
For more information about payment terms, see here.
Step 5: Configuring InMobi as an Ad Source on AdMob’s Dashboard
- Log on to your AdMob account.
- Navigate to the specific ad-unit that you want to monetize via the InMobi SDK.
-
Under mediation navigate to ad-sources (if you have integrated solely with AdMob, number of ad sources will be one). Select new ad network, and then add InMobi as ad source.
-
In the Network Settings page for InMobi, insert your InMobi account ID and placement ID.
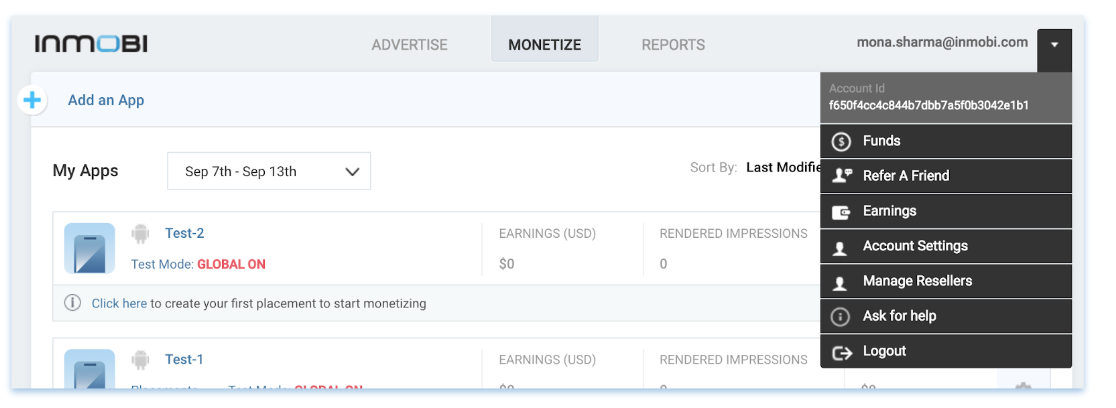
Your account ID is available in your InMobi account as illustrated in the screenshot below.
Placement ID is under the placements section as illustrated in the screenshot below.
- Setting up Ad network optimization: For automatic eCPM optimization, the publisher must provide his/her InMobi reporting API credentials in the AdMob UI.
Reach out to InMobi support to generate the secret key required for this feature.
Setting up Rewarded Interstitials
You can configure the reward either on AdMob’s dashboard or on InMobi’s dashboard.
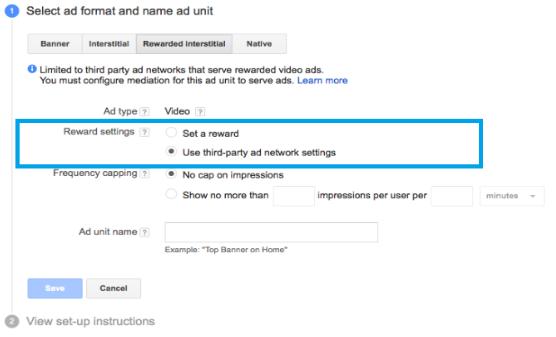
To configure the same on InMobi’s dashboard, choose Use third-party ad network settings.
Fill in the key-value pair for the reward details, which the InMobi SDK will honour once the user completes watching the video. AdMob will in turn pass this back in the reward callback. For example, you could fill in the following reward details:
Key = Coins, Value = 1000
While setting up the rewards on InMobi dashboard, make sure the reward value is in the form of Integer.
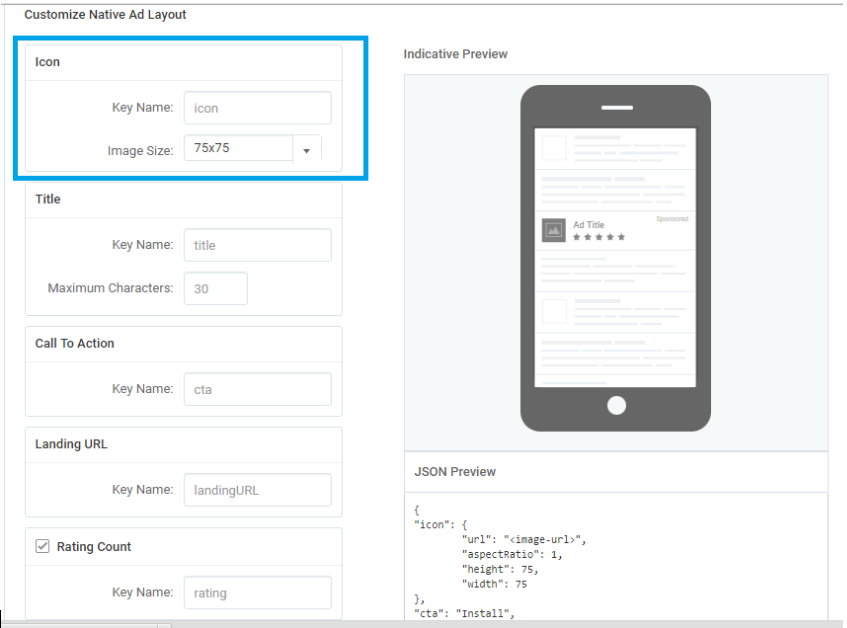
Setting up Native Ads
Ensure not to change key names on InMobi dashboard when creating a native content placement type on the InMobi dashboard to support a native ad unit on AdMob’s dashboard. This is to ensure that the InMobi integration works seamlessly on native ad formats.
Notes:
- InMobi Adapter doesn’t honor
shouldRequestMultipleImages
flag for Native Ads in AdMob SDK. - InMobi Adapter also doesn’t honor
getImageOrientation/preferredImageOrientation
flag in AdMob SDK.
Step 6: Integrating InMobi SDK via AdMob Adapter
Integrating the InMobi SDK and the AdMob Adapter is fairly seamless. To get an ad from InMobi, you need to incorporate both InMobi SDK and the Adapter.
Adding the InMobi SDK to your Project
Method 1: Pulling the latest SDK via jCenter
If you are using Gradle to build your Android applications, you can pull the latest version of the SDK from jCenter.
To do so:
- Include this in your top-level
build.gradle
file:allprojects { repositories { jcenter() } }
-
Add the following line to the dependencies element in your application module’s
build.gradle
.compile 'com.inmobi.monetization:inmobi-ads:7.x.x'
- Sync your Gradle project to ensure that the dependency is downloaded by the build system.
Method 2: Adding the SDK library to your application project
Alternately, you can download the latest version of InMobi’s SDK
here and copy the library to your application module’s libs/
directory.
To add the library to your project’s dependencies, add this line to the dependencies element in your module’s
build.gradle
.
compile fileTree(dir: 'libs', include: ['*.jar'])
Adding and Verifying the Dependencies
To monetize with the InMobi ad SDK, you must add the following dependencies:
- Google Play Services
The InMobi SDK for Android needs the Google Play Services library to enable better ad targeting via the Google Play Advertising ID. Additionally, the SDK also uses the Google Play Services for getting a location fix, should the User consent to collecting location.
To add the Google Play Services client library to your application:
-
Add the following line to the application module’s dependency element.
compile 'com.google.android.gms:play-services:8.4.0'
- Sync your Gradle project to ensure that the dependencies are included.
-
Add the following element to your application manifest.
<meta-data android:name="com.google.android.gms.version" android:value="@integer/google_play_services_version" />
-
Add the following line to the application module’s dependency element.
- Picasso
The InMobi SDK for Android uses the popular Picasso library for loading the ad assets.
To add the Picasso library to your application:
-
Add the following line to the application module’s dependency element in the Gradle build script.
compile 'com.squareup.picasso:picasso:2.5.2'
- Sync your Gradle project to ensure that the dependencies are included.
Note: Failure to include
Picasso
dependency in your application gradle scripts will cause interstitial ad requests to fail, thus affecting monetization of your app with the InMobi SDK. -
Add the following line to the application module’s dependency element in the Gradle build script.
-
Support Library
For the Native Strands ad format, you must add the support-v4 library.
To do so, add the following line to the application module’s dependency element in the Gradle build script.
compile 'com.android.support:appcompat-v7:24.0.0'
-
RecyclerView
For supporting free scroll of a deck of images or ads, you must use
RecyclerView
.To do so, add the following line to the application module’s dependency element in the Gradle build script.
compile 'com.android.support:recyclerview-v7:24.0.0'
Note: Failure to include
RecyclerView
dependency in your application gradle scripts will cause interstitial ad requests to fail, thus affecting monetization of your app with the InMobi SDK.
Changing the Manifest File
Declare the
InMobiAdActivity
element in your application like so if your app is targeting API level 24 or higher.
<activity android:name="com.inmobi.rendering.InMobiAdActivity" android:configChanges="keyboardHidden|orientation|keyboard|smallestScreenSize|screenSize|screenLayout" android:hardwareAccelerated="true" android:resizeableActivity="false" android:theme="@android:style/Theme.NoTitleBar" tools:ignore="UnusedAttribute" />
In particular, note the
android:resizeableActivity=”false”
attribute and configuring this activity for screenLayout
changes.
Granting Permissions
You must include the following mandatory permissions in your application manifest. Failure to include these permissions will affect your ability to monetize your application on the InMobi network.
<uses-permission android:name="android.permission.INTERNET" /> <uses-permission android:name="android.permission.ACCESS_NETWORK_STATE" />
In addition to the mandatory permissions above, it is highly recommended that you include either the
ACCESS_COARSE_LOCATION
or the ACCESS_FINE_LOCATION
to enable better ad targeting. This is not a mandatory permission; however, including it will enable accurate ad targeting.
<uses-permission android:name="android.permission.ACCESS_FINE_LOCATION" />
For further improved targeting, you can add the
ACCESS_WIFI_STATE
and the CHANGE_WIFI_STATE
permissions to the manifest.
<uses-permission android:name="android.permission.ACCESS_WIFI_STATE" /> <uses-permission android:name="android.permission.CHANGE_WIFI_STATE" />
If you are requesting for rich-media ads, you can add the following permissions.
<uses-permission android:name="android.permission.READ_CALENDAR" /> <uses-permission android:name="android.permission.WRITE_CALENDAR" /> <uses-permission android:name="android.permission.WRITE_EXTERNAL_STORAGE" />
Hardware Acceleration
Hardware acceleration allows you to display HTML5 video ads. To do this, add
hardwareAccelerated:true
element to the application
tag.
Proguard Configuration
Proguarding helps to remove unused symbols and reduce the final application footprint. The following proguard directives should be added to your application’s proguard configuration file.
-keepattributes SourceFile,LineNumberTable -keep class com.inmobi.** { *; } -dontwarn com.inmobi.** -keep public class com.google.android.gms.** -dontwarn com.google.android.gms.** -dontwarn com.squareup.picasso.** -keep class com.google.android.gms.ads.identifier.AdvertisingIdClient{public *;} -keep class com.google.android.gms.ads.identifier.AdvertisingIdClient$Info{public *;} #skip the Picasso library classes -keep class com.squareup.picasso.** {*;} -dontwarn com.squareup.picasso.** -dontwarn com.squareup.okhttp.** #skip Moat classes -keep class com.moat.** {*;} -dontwarn com.moat.** #skip AVID classes -keep class com.integralads.avid.library.** {*;}
Preparing your App for Android P
InMobi SDK is compatible with Android P (API level 28), the latest version of the Android platform.
Android P onwards apps make connections over HTTPS by default. Though InMobi supports the adoption of HTTPS, the current setup requires our demand partners to support HTTPS as well. The publisher can change their settings to HTTP if it has an impact on the revenue potential.
Adding the InMobi Adapter to your Project
AdMob ImageView vs MediaView
There are two different approaches for integrating InMobi Native Ads through AdMob Mediation.If the publisher wants to show the static native ads using ImageView ( https://developer.android.com/reference/android/widget/ImageView), then they need to add the InMobi’s AdMob Adapter dependency “implementation ‘com.google.ads.mediation:inmobi-imageview:7.2.2’” in the app.
If the publisher wants to show both the native static/video ads using MediaView ( https://developers.google.com/android/reference/com/google/android/gms/ads/formats/MediaView), then they need to add the InMobi’s AdMob Adapter dependency “implementation 'com.google.ads.mediation:inmobi:7.2.1.0'” in the app.
In case of AdMob Native Ads,if the returned ad contains a video element, the video will be automatically rendered on this MediaView. In the absence of MediaView, a fallback image will be returned in getImages(). Reference: https://firebase.google.com/docs/reference/android/com/google/android/gms/ads/formats/MediaView.
There are two approaches for handling ImageView and MediaView while integrating InMobi Native Ads through AdMob Mediation due to following reasons:
- We will not be sure if the publisher is using a MediaView or ImageView on his end.
- Since the primary view is used for impression tracking in our case, if the publisher is using ImageView, we will have to rely on AdMob for impression tracking.
- If using MediaView, InMobi primary view will be responsible for impression tracking.
Features | ImageView Adapter | MediaView Adapter |
Android View Support | ImageView(Android) | MediaView(Admob) |
Impression Rendering | Controlled by AdMob.Returns a callback on impression rendering and we fire impression beacons based on that. | Controlled by InMobi SDK. It fires impression beacons based on the viewablilty of InMobi’s PrimaryView. |
Ads Supported | Supports only static native ads | Supports both native image and video ads |
Reference Links | InMobi support portal: https://support.inmobi.com/monetize/mediation-guidelines/admob/ | AdMob official documentation: https://developers.google.com/admob/android/mediation/inmobi |
Support for feed Integration without screenshot | Yes, as the impression handling is controlled by AdMob's callback. | No, as InMobi PrimaryView is mandatory. |
Impression Rendering with Assets except Primary View
This is a very common use case where the publishers want to attach only native icon,title and description assets except the Image/Video Assets(Primary View). As mentioned earlier, only the InMobi ImageView adapter dependency (com.google.ads.mediation:inmobi-imageview:7.2.2) supports this use case as the impression handling is controlled by the AdMob’s callback (which supports beacon firing for this use case).
Whereas in case of InMobi MediaView adapter dependency (com.google.ads.mediation:inmobi:7.2.1.0), the impression handling is controlled by InMobi SDK based on viewability of InMobi's Primary View. So this use case is not supported by MediaView as the InMobi Primary View is mandatory for the impression rendering.
Code Steps
The code steps remain the same as they are for regular AdMob integration for fetching and loading an ad. Use the AdMob account ID to initialize the AdMob SDK and AdMob “ad unit id” to request and fetch an ad.
Passing user consent information to InMobi SDK
The publishers monetizing in EEA region will have to pass user consent to InMobi SDK. The publishers can use consent gathering mechanism of their choice (like Consent SDK), and they will have to pass on this consent information to InMobi.
To pass consent information, the publisher has to call:
InMobiConsent.updateGDPRConsent( consentObj );
The consentObj will be a JSON object with the following keys:
Key | Type | Inference |
gdpr_consent_available | boolean |
true - Publisher has provided consent to collect and use user’s data.
false - Publisher has not provided consent to collect and use user’s data. Note: Any value other than true and false is invalid and will be treated as value not provided by publisher, i.e. empty value. |
gdpr | Number | Whether or not the request is subjected to GDPR regulations, deviation from the set values true and false, indicate an unknown entity. |
More Information
Download the sample code from here.
The latest documentation and code samples for the AdMob SDK are available here.
Step 7: Testing the Integration
To ensure AdMob SDK relays the ad request to InMobi for testing:
- Set manual Ad network optimization for every network including AdMob. Uncheck the Ad network optimization check box.
- Set manual eCPM floors for all networks keeping the eCPM floor for InMobi higher than other networks, this will ensure that the ad request gets relayed to InMobi for testing. In the example below, InMobi floor is set to $5 and AdMob is set to $0.01.
After performing the steps above, you can test and relay the requests to InMobi SDK for ad loads.
Enabling Key SDK Logs
You can add the following line to your Activity where you are integrating the ad-units to enable key SDK logs.
InMobiSdk.setLogLevel(LogLevel.DEBUG);
You can also leverage feedback available on the diagnostics tab on the ad unit and ad request if you have enabled “Test Mode” on InMobi portal.
Step 8: Advanced
Providing Location and Demographics Data
Passing Location Signals
Recommended: 
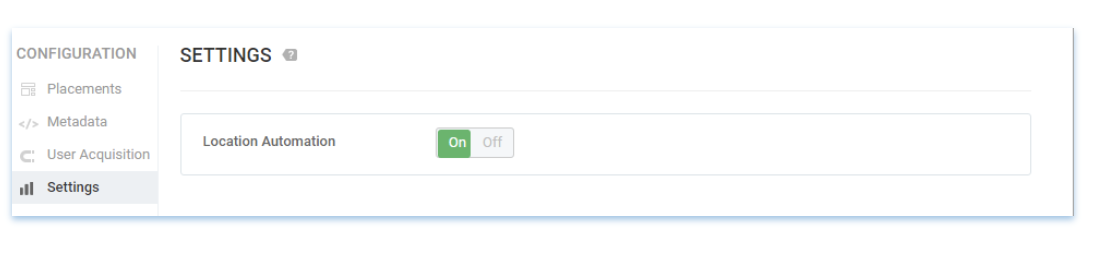
If your app collects location from the user, we recommend passing it up, as impressions with location signal have higher revenue potential. InMobi SDK will automatically pass the location signals if available in the app. If you use location in your app, but would like to disable passing location signals to InMobi, then TURN OFF the “Location Automation” for your property on the InMobi dashboard.
Otherwise: You will have to modify the Custom Event class for your ad-unit to pass on the data using the InMobi SDK API. Please see sample code for more details
InMobi supports the following parameters.
Method Name | Value | Description |
setAgeGroup |
AgeGroupBelow18 AgeGroupBetween18And24 AgeGroupBetween25And29 AgeGroupBetween30And34 AgeGroupBetween35And44 AgeGroupBetween45And54 AgeGroupBetween55And65 AgeGroupAbove65 |
The age group of the user |
setEducationType |
EducationHighSchoolOrLess EducationCollegeOrGraduate EducationPostGraduateOrAbove |
The education level:
|
setAge |
Integer |
The age of the user |
setInterests |
Any String |
Any additional relevant description of the user, or their preferences, separated by commas. Valid acceptable values are mentioned below |
setPostalCode |
Any String |
The postal code (usually a five-digit number) |
setAreaCode |
Any String |
The area code (part of the telephone number) |
setLanguage |
Any String |
The native language of the user (if known) |
setLocationWithCityStateCountry |
Any String |
Sets location with City, State, Country being passed |
setKeywords |
Any String |
Keywords to be passed in the ad request |
Sample for setting up the InMobi SDK Demographic params. Publisher need to set the values of params as they want.
InMobiSdk.setAreaCode("080"); InMobiSdk.setEducation(Education.HIGH_SCHOOL_OR_LESS); InMobiSdk.setGender(Gender.MALE); InMobiSdk.setAge(23); InMobiSdk.setPostalCode("122009"); InMobiSdk.setLogLevel(LogLevel.DEBUG); InMobiSdk.setLocationWithCityStateCountry("blore", "kar", "india"); InMobiSdk.setLanguage("ENG"); InMobiSdk.setInterests("dance"); InMobiSdk.setYearOfBirth(1980);