Welcome to InMobi CMP! After you sign up, you will land on the My Properties page. To enable consent management and regulatory compliance for your apps, you will need to add and protect a property first.
The Property creation process is divided into four sections:
On the Properties page, click Create Property and select Protect an App from the dropdown.
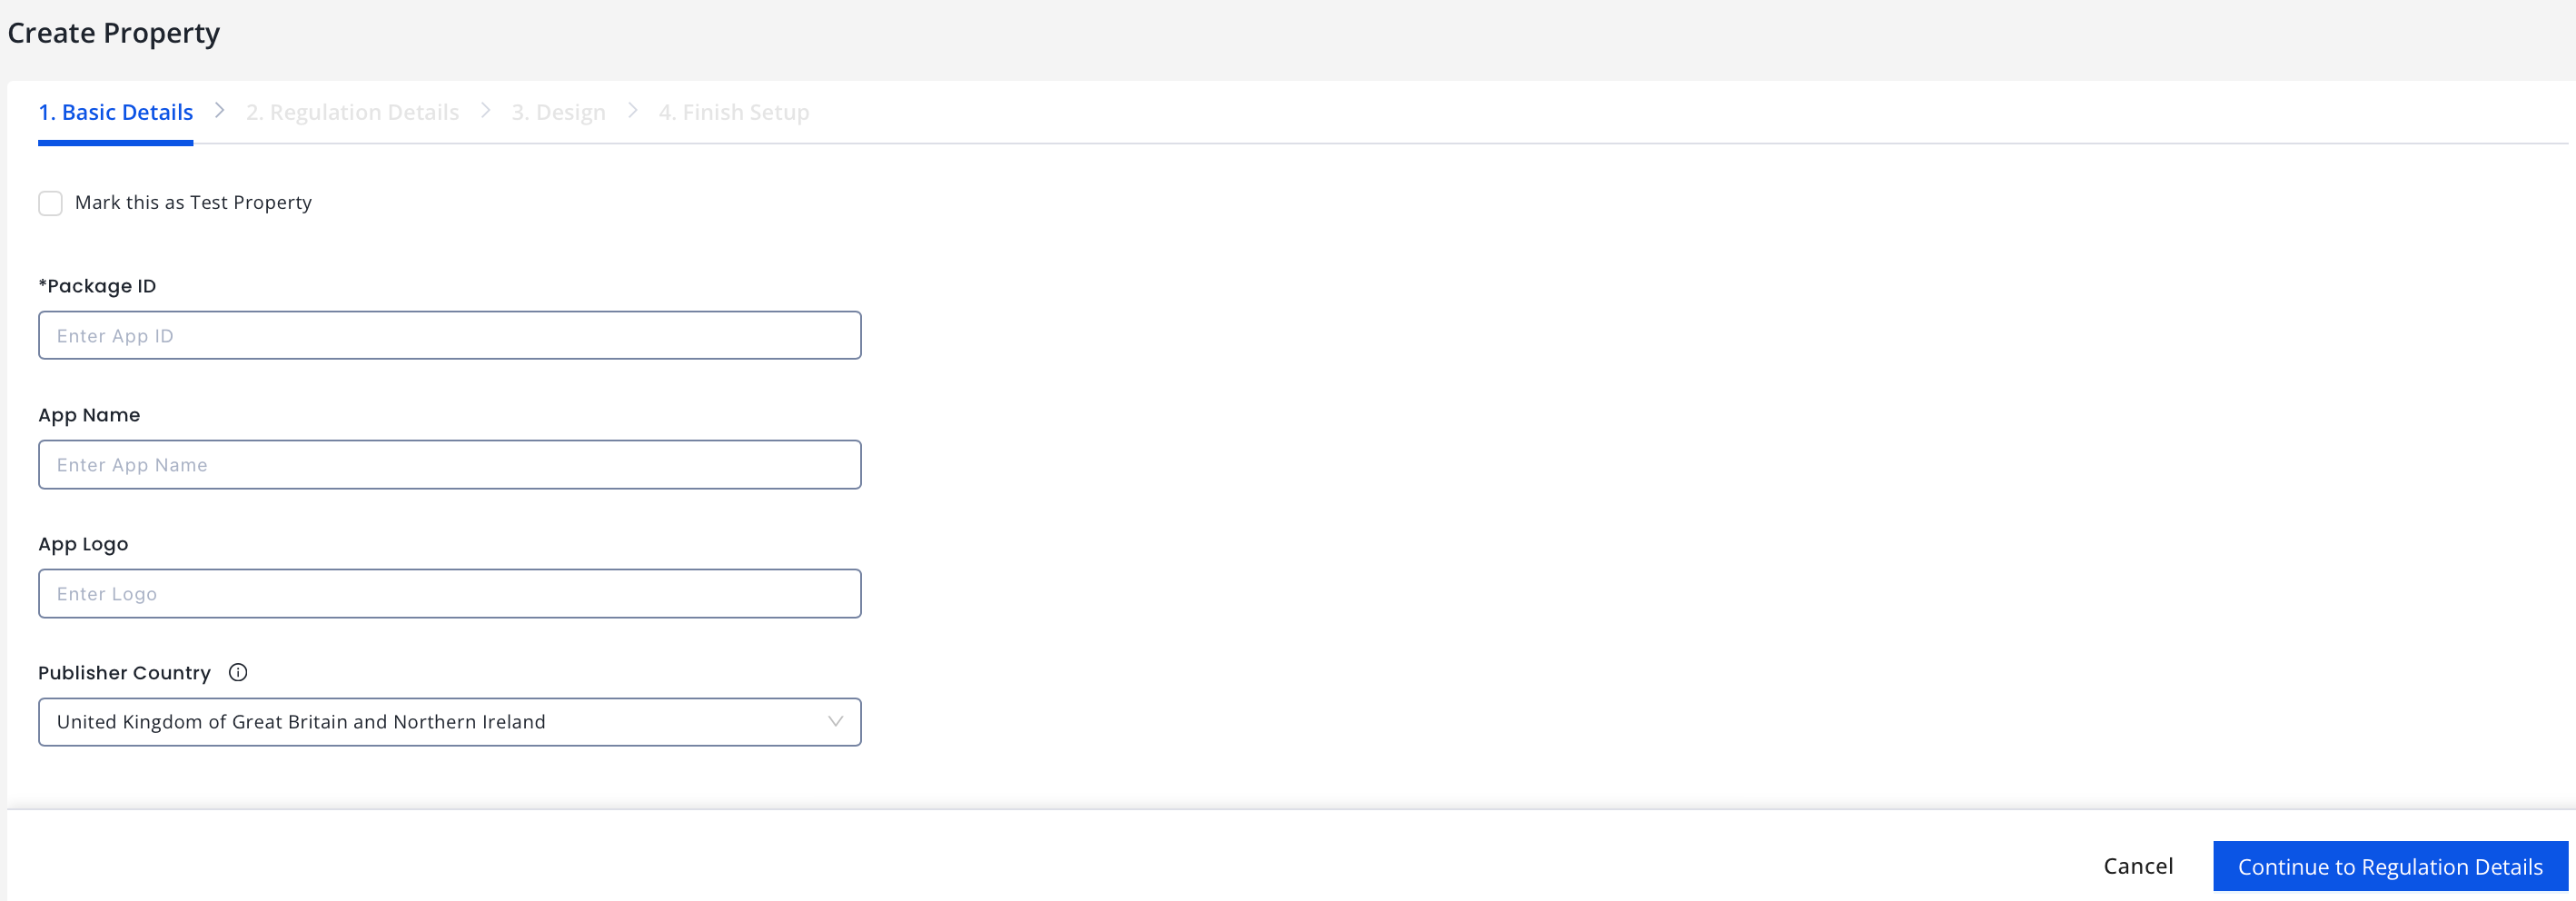
In the Basic Details section, enter the following information about your app. All starred items are required.
PackageID: Enter your app's package ID/Bundle ID.
Note
Ensure the Package ID/Bundle ID matches exactly with the live app's package ID/bundle ID to avoid issues with consent pop-up delivery. Examples are:
Android → com.example.myapp
iOS → com.company.appname
App Name: Enter the name of your app.
Note
The app name must be non-empty and should reflect the actual name of the app the user will be interacting with. Recommended length is 5-50 characters.
App Logo: Enter the logo's URL, if you wish to have it on the consent pop-up. The image size is capped at 170px wide and 90px tall to maintain the layout.
Note
The logo's URL should be a full (absolute) URL path to a hosted image that will be displayed on all pages of the CMP UI.
Ensure the image URL shared is accessible and does not require login or authentication.
Use PNG, BMP, JPG/JPEG, and GIF file formats for app logos with a ratio between a quotient of 1 to 3.5.
Use a lightweight image, within <200KB>, to ensure quick loading of the logo.
Publisher Country: Enter the country where you(publisher or data controller) are legally registered.
Note
It’s important to accurately specify your country during setup. This allows us to apply the right legal framework and data privacy regulations (like GDPR, CCPA, LGPD, etc.) based on your jurisdiction. Ensure to share the correct country so we can incorporate country-specific regulations accurately into your CMP configuration.
Once done, click Continue to Regulation Details.
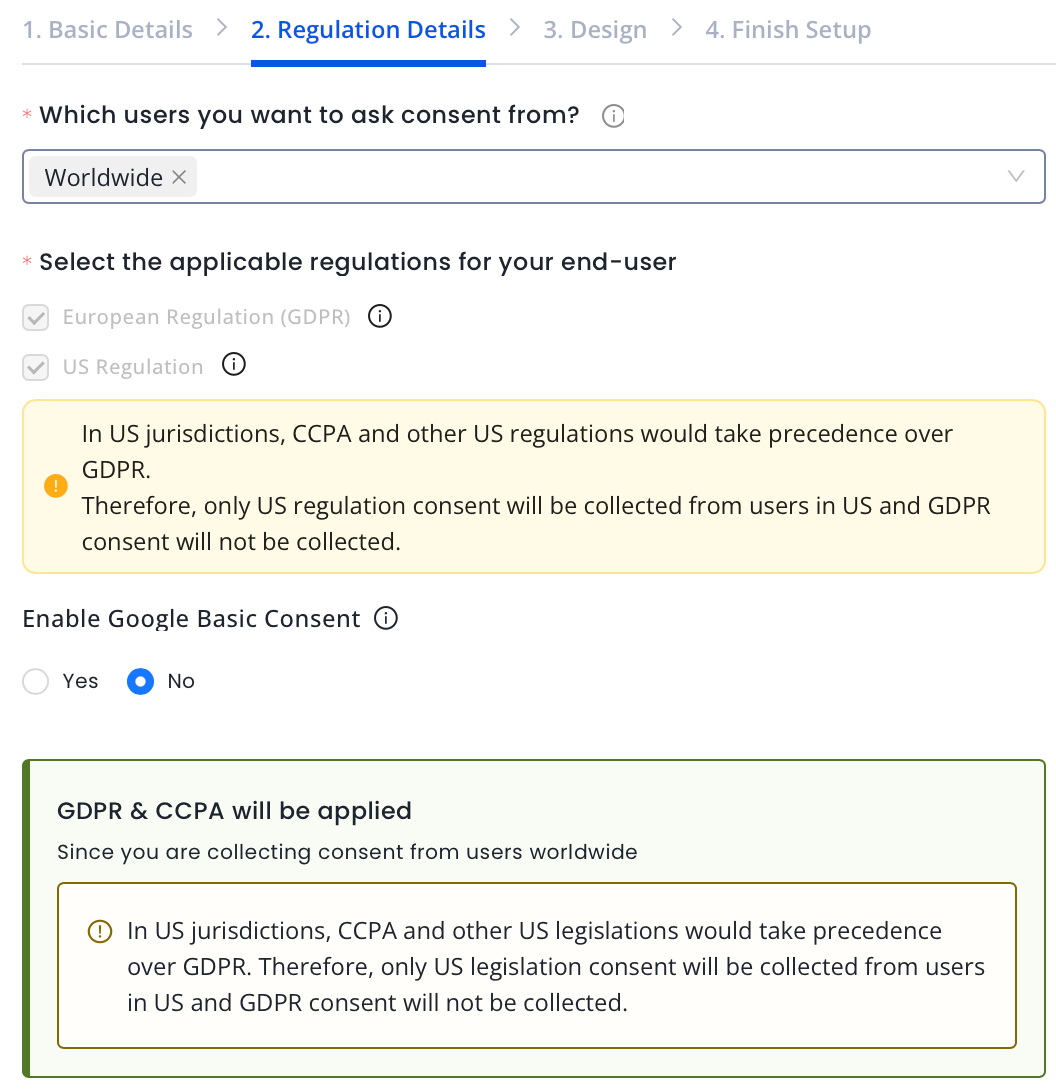
Regulation Details
Once you save the basic details for your app, you need to add the regulation details to ensure your app's consent collection is compliant with data privacy laws.
Select the location of the audience you wish to target in the Which users you want to ask consent from? field. This option enables you to decide which user should be prompted for consent based on their location. Your regulation will be selected automatically based on the location.
Note
Applicable jurisdiction (GDPR/US MSPA/Others) will be auto-applied as per the location of the user.
European Economic Area(EEA) is governed by GDPR. Set the consent location as EEA when you want to enable consent collection (like showing a consent banner) for users located within the European Economic Area (EEA). Refer to this list of countries governed under EEA.
For countries other than EEA and US, GDPR will be applied if you select these locations for consent collection.
To enable consent collection for all users, select the location as Worldwide.
Enable Google Basic Consent if you monetize via Google platforms (AdSense, Ad Manager, AdMob). For details, see Introduction.
Note
This setting ensures that Google receives minimal consent signals required to show compliant ads, even if full TCF is not supported by all vendors or in limited consent cases.
Ensure that Google is listed as a vendor in your CMP’s vendor list.
If you enable this setting but fail to configure Google as a vendor or include them in purposes, it can cause Google ad delivery failures.
Note
Enabling this option will automatically add the following Google-specific notice to your consent banner or popup: “Please note that this website/app uses one or more Google services and may gather and store information, including but not limited to your visit or usage behaviour. You may click to grant or deny consent to Google and its third-party tags to use your data for the below specified purposes in the Google consent section.” This message helps ensure transparency and compliance when using Google tags or technologies, as required under regulatory frameworks like GDPR and by Google’s own policies.
GDPR Consent Details
In this section, you will need to set the GDPR consent preferences for your app.
Select the String format for encoding the GDPR consent.
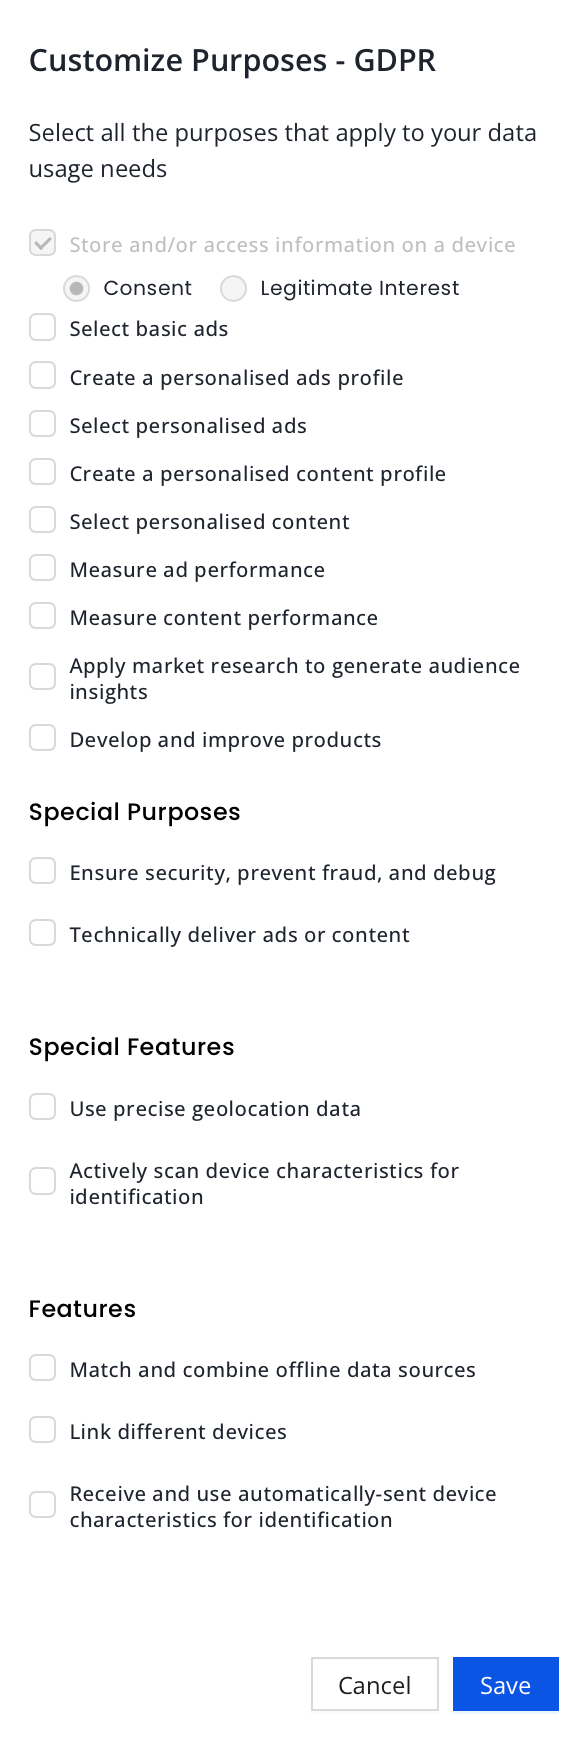
Under Your consent configuration, you need to define your legal basis. Legal basis refers to the justification for processing personal data. When you declare this, you are specifying the lawful reason for collecting and using personal information under the privacy regulations.
By default, I don’t declare a legal basis for my property is selected, meaning the CMP is inactive.
To declare your legal basis, click on I define my legal basis. If selected, Consent Purposes will appear. InMobi CMP provides one recommended stack out of the box that covers many use cases. Based on the purposes selected, the purposes will be displayed as either purpose or as the proposed stacks. More information about the purposes and stacks can be found in the IAB Framework Policies.
Configure GDPR in the US region: You no longer need to trigger the consent screen by calling the required API if you select Yes. Enabling GDPR in the US is not recommended.
Note
GDPR will apply if you select Yes.
gdprApplies: true and TCF string will also be generated as per consent from the user.
The default will always be CCPA if you select No. We strongly recommend selecting No.
We recommend testing this configuration on your test site/environment to ensure it is functioning properly.
GDPR Vendor Details
Show New Vendors Every: Set the frequency (in days) for the CMP to check for additions or changes to the vendor list and re-prompt users for consent if changes are found.
Google Vendors: Select the checkbox if you wish to enable Google Vendors.
Note
Enabling Google vendors in your TCF string has both technical and monetization implications, as Google interacts with the IAB TCF v2 framework differently from most vendors. We recommend enabling this option only if you monetize with Google.
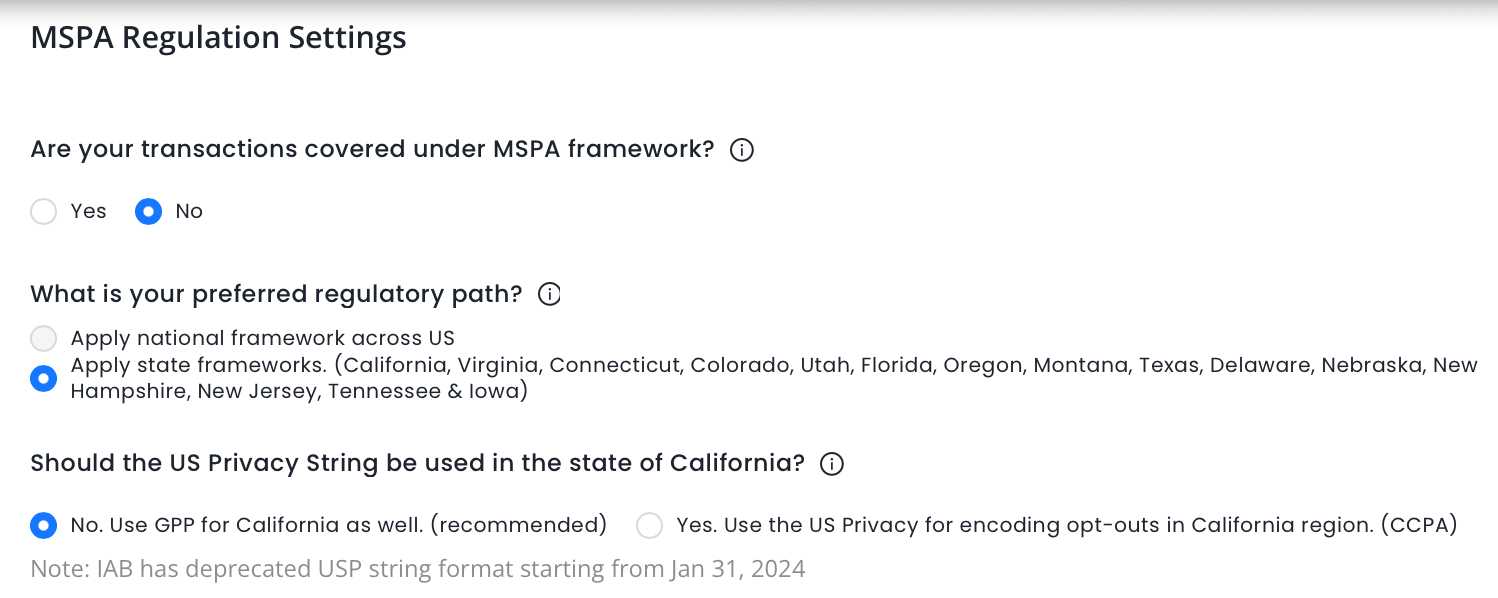
MSPA Regulation Settings
Select Yes or No for Are your transactions covered under MSPA framework?
Note
Select Yes, only if you are an MSPA signatory. If you're unsure of your status, check the IAB for the signatory list here.
Choose your preferred regulatory path. If you are an MSPA signatory, it is recommended to use the National framework across the US. For more details, see What is a Regulatory Path?
Note
Non-MSPA member state framework applies to the list of states mentioned on the portal. For other states national framework will be applicable.
Select Yes or No for Should the US Privacy String be used in the state of California? If you select Yes, you will need to confirm whether you have signed the LSPA.
Note
We recommend using GPP for California as well, since IAB has deprecated the USP string format starting from Jan 31, 2024.
If you are unsure, leave this field unchecked - this will not impact your usage of the CCPA opt-out signal.
You can also customize the CCPA Do Not Sell My Data Screen like you can do for GDPR. You can amend the Title string, Body text and the links to the Delete/Access data and Privacy Policy. You can do this by going to Themes > Create a Theme (or edit an existing theme). For more information, see Website.
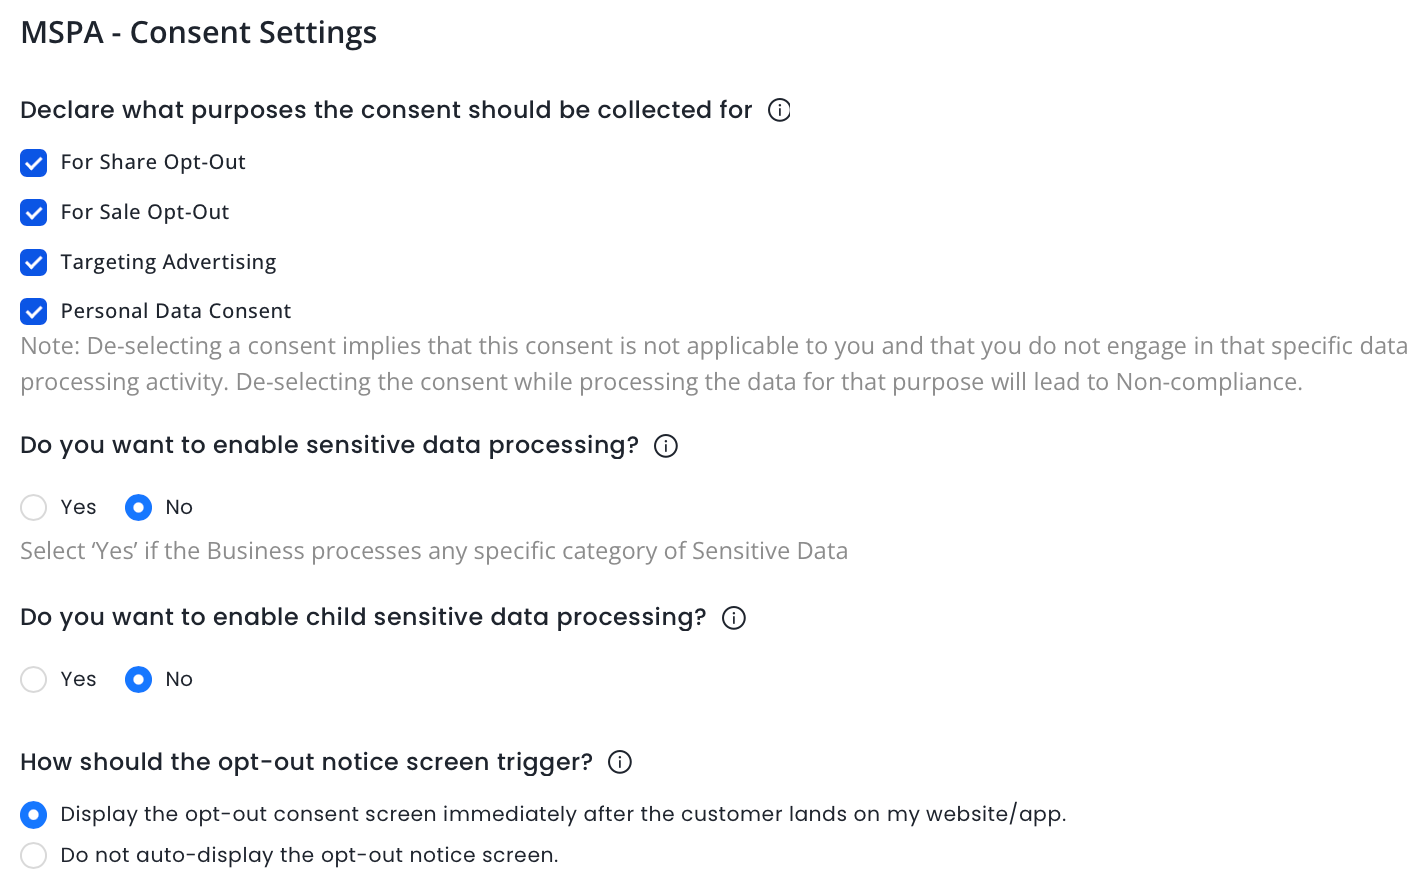
MSPA - Consent Settings
Declare the purposes for which consent will be collected.
Select Yes or No if you process any kind of sensitive data.
Select Yes or No for child sensitive data processing.
Define how you wish to trigger the opt-out notice screen. If you wish to display privacy consent as a link at the footer, see Consent Banner via link.
Once you have finished, click Continue to Design.
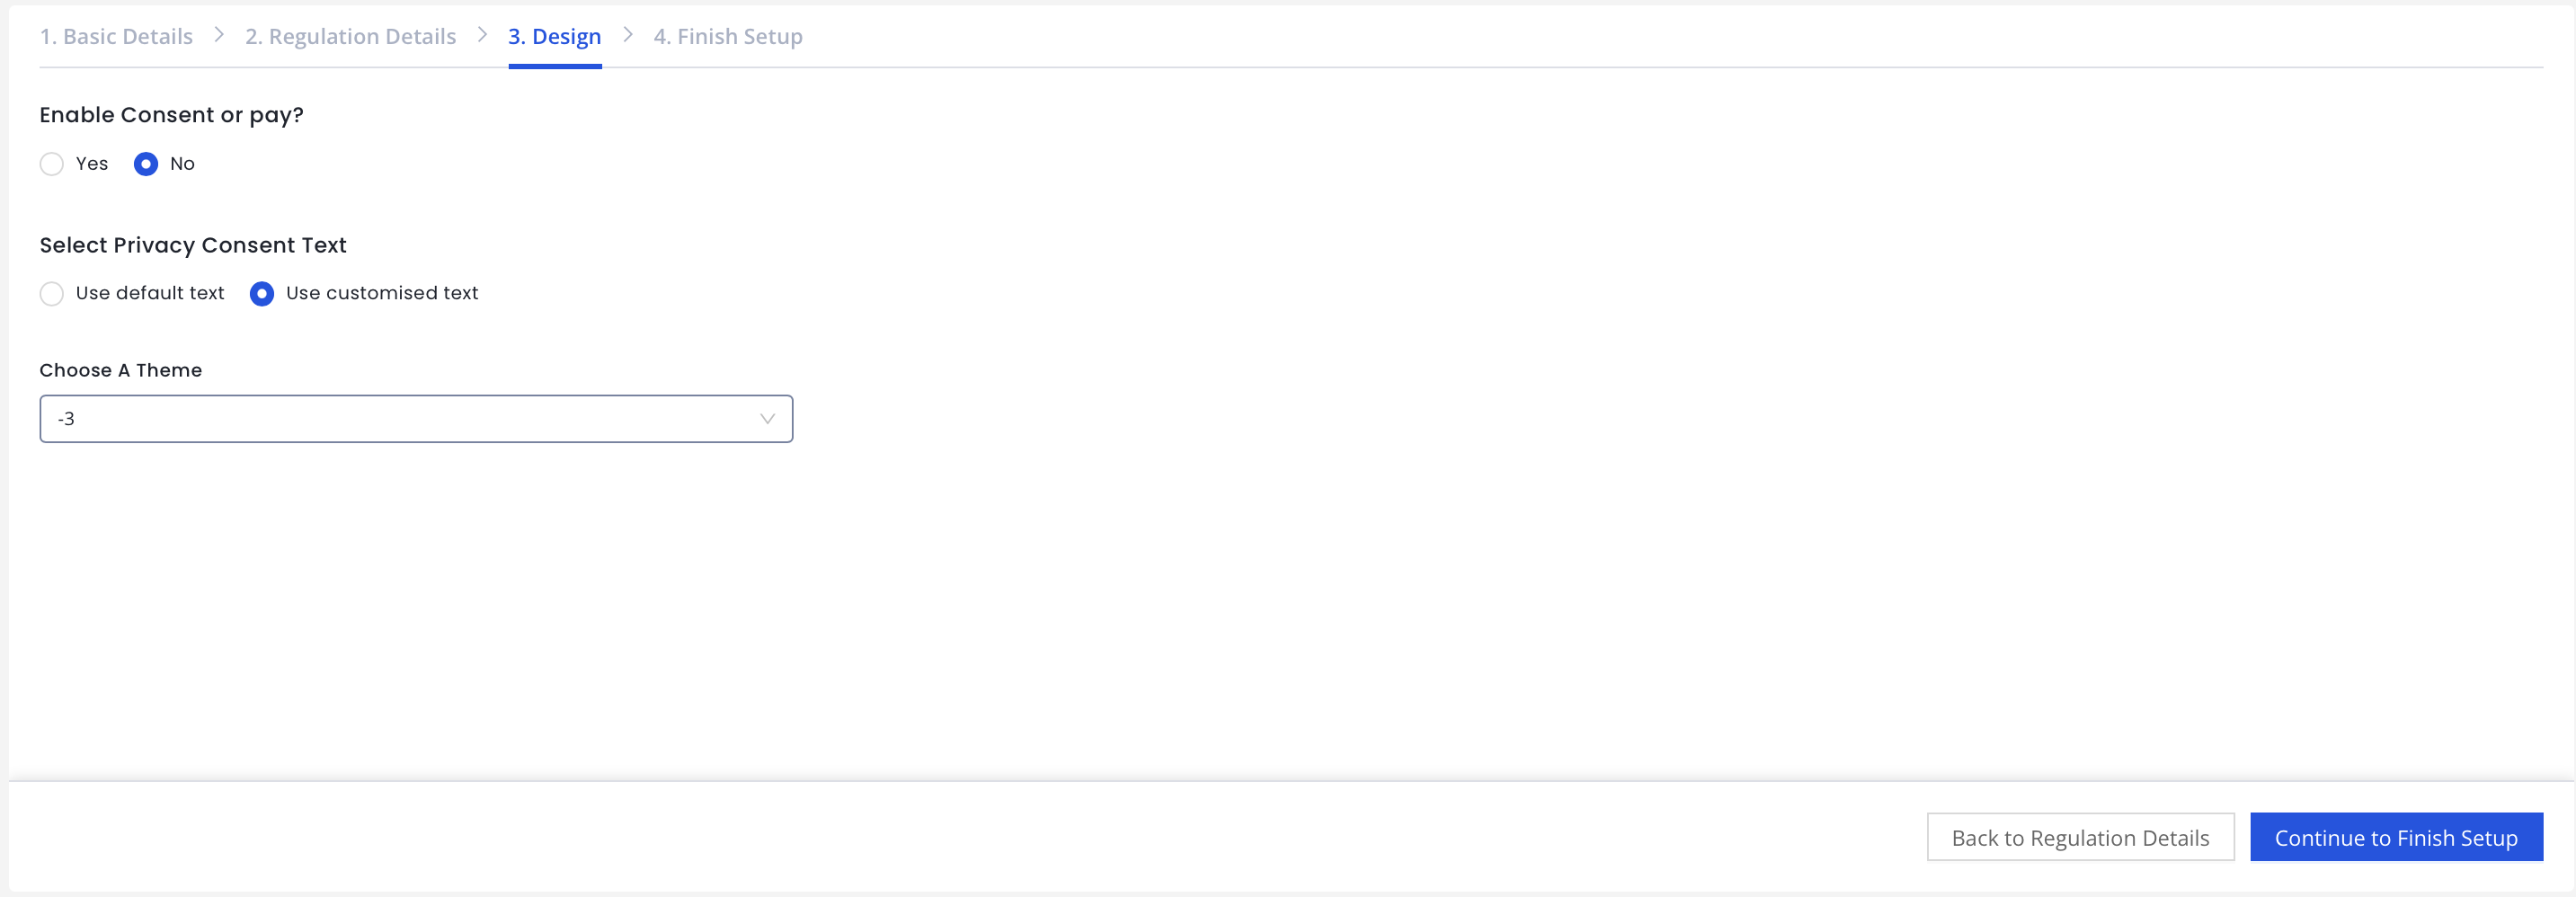
Design
After you finish setting consent preferences for your site, it's time to set the theme and UI of the end-user consent screen.
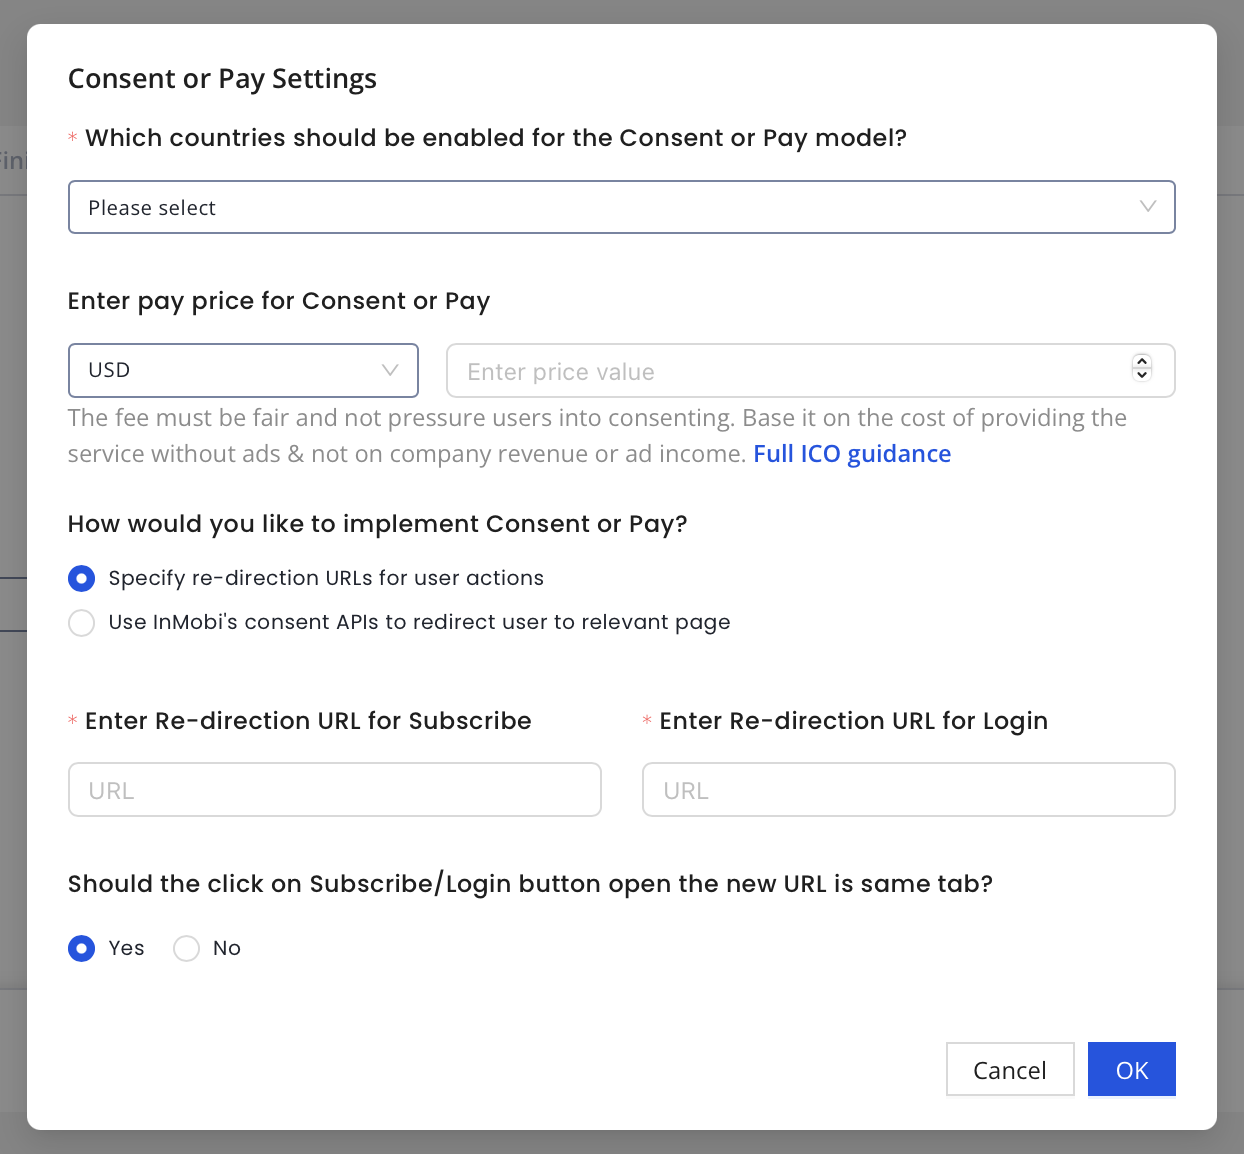
Select Yes or No to enable Consent or Pay. For more information, see Consent or Pay.
If you select Yes, fill in the following information.
Select Privacy Consent Text to indicate if you wish to use the default text or modify it.
Select the desired theme for your site. You can preview your theme on the right side, along with the device type.
Click Continue to Finish Setup.
Finish Setup
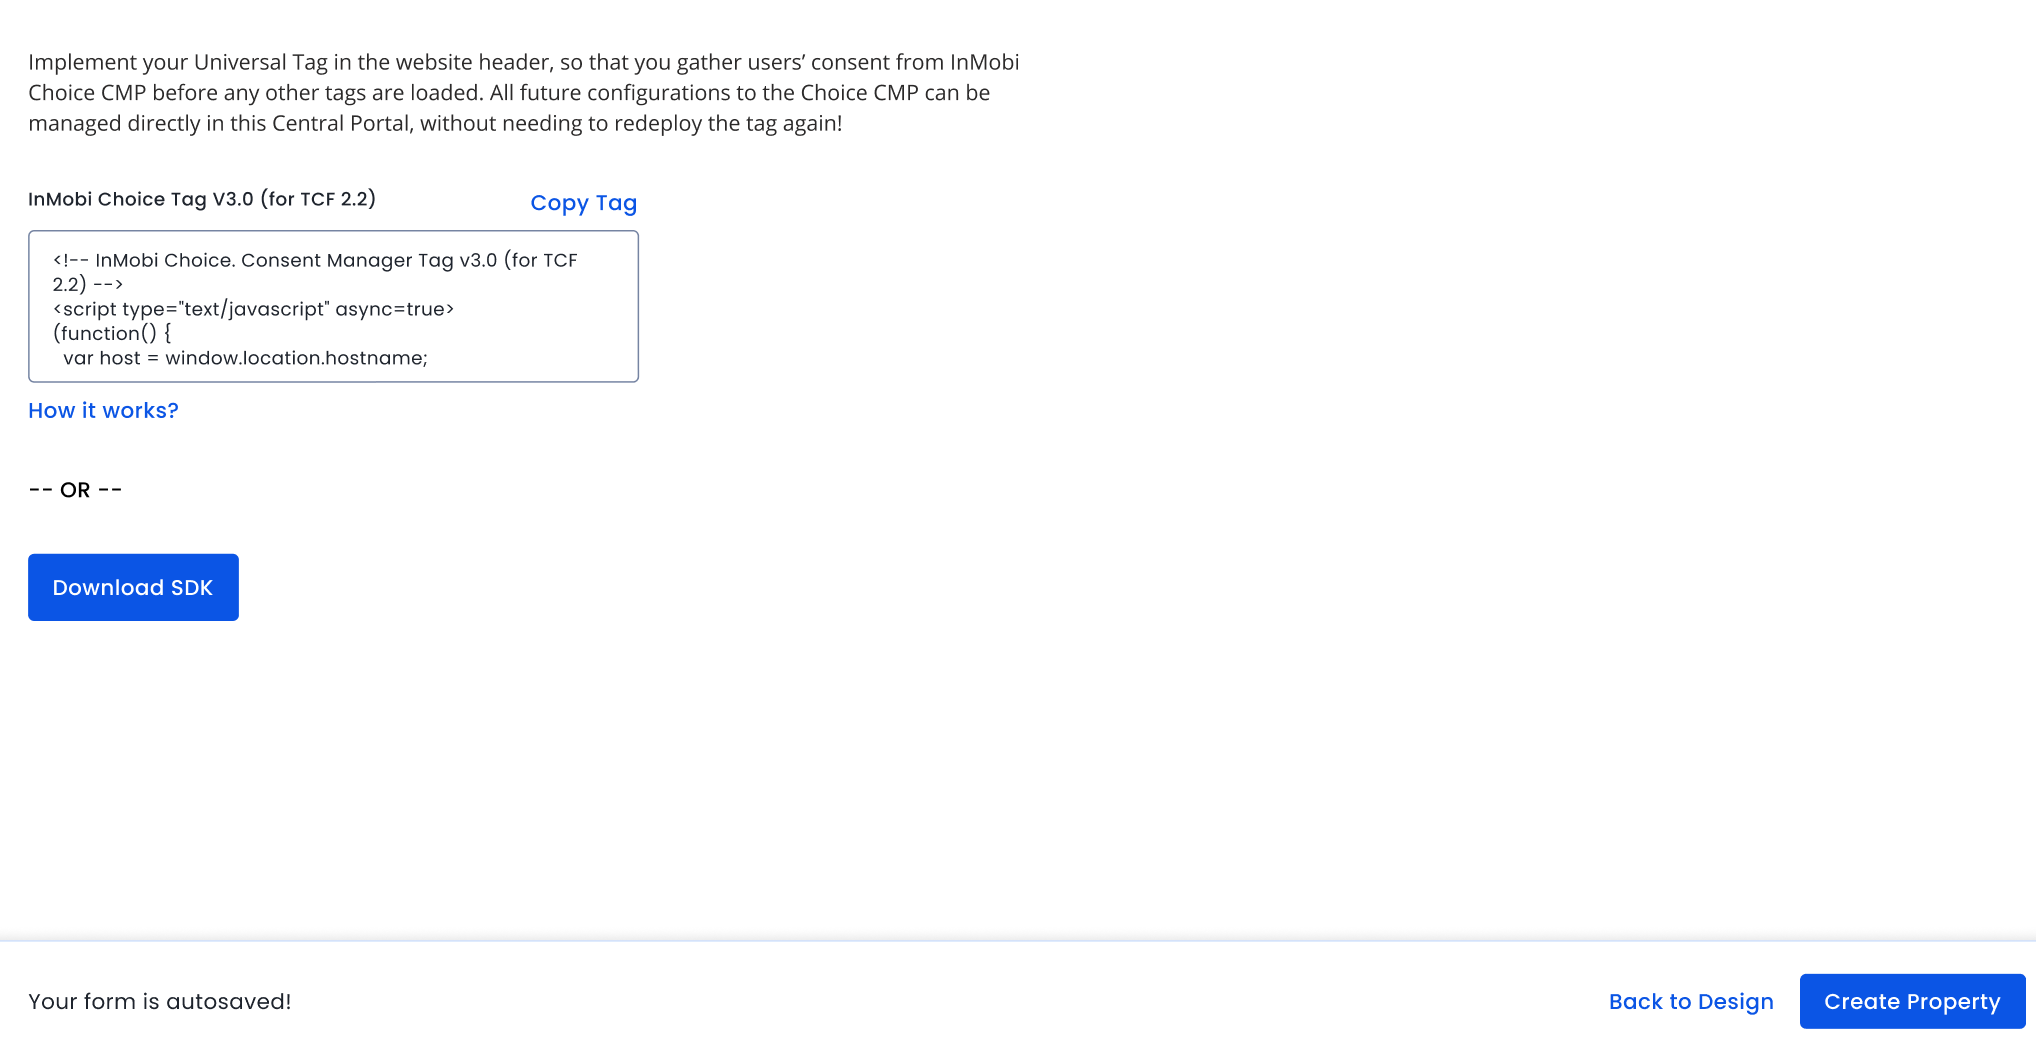
The final step in setting up your property is implementing the Universal Tag.
Download Tag or copy/paste the tag in your website's header to collect consent. For more information, see Implementing Web SDK.
Alternatively, you can click Download SDK to configure the latest SDK version for your app.
Once done, click Create Property.
On This Page
Last Updated on: 14 Dec, 2025
✕
You are almost there...
By installing this SDK update, you agree that your Children Privacy Compliance setting remains accurate or that you will update that setting, whenever there is a change in your app's audience. You may update the app's Children Privacy Compliance settings at https://publisher.inmobi.com/my-inventory/app-and-placements.

 Support Center


