InMobi CMP empowers site and app owners to efficiently handle consent across diverse devices and environments, including iOS. InMobi CMP strictly adheres to the IAB TCF v2.2 standard.
Ensure a minimum iOS version of 11.0 or above for seamless operation.
The CMP's User Experience (UX) is seamlessly integrated within a viewController, presenting a user-friendly overlay on top of the rootViewController of your application.
The IAB TCF v2 mobile specifications securely store all consent data, utilizing UserDefaults for robust data management.
We have UI customization capabilities within our SDK. This feature empowers developers to tailor color schemes and font styles for all UI components used in the InMobi CMP. This ensures seamless integration with the host application's UI style. For more information on customizing styles, see UI Customization for Mobile iOS.
Before integrating InMobi CMP into your mobile app, make sure you have followed the instructions on how to protect an app. Once done, click Download SDK.
If you are not already using Cocoapods, go to your Xcode project directory and initialize the pod using the following command in the terminal:
pod init
Podfile should be generated as a result of Step 1. Open the podfile and add InMobiCMP pod as shown below:
target 'InMobiCMPExample' do
  use_frameworks!

  # Pods for InMobiCMPExample
  pod 'InMobiCMP', '1.2.1'

end
Once you have added it to the pod file, run the command below to complete the task of installing the dependency.
pod update
xcworkspace file to access your project.

The following methods are supported for integrating InMobi CMP:
UIApplicationDelegate class, import InMobiCMP using the following statement.
import InMobiCMP
Initialize CMP: Call ChoiceCmp.shared.startChoice method. This method requires the following parameters:
If shouldDisplayIDFA is true, it is imperative to add the NSUserTrackingUsageDescription key to your info.plist. Provide a clear description of how your app will utilize this value.![]()
import UIKit
import InMobiCMP

@main
class AppDelegate: UIResponder, UIApplicationDelegate, ChoiceCmpDelegate, CCPADelegate {
    func application(_ application: UIApplication, didFinishLaunchingWithOptions launchOptions: [UIApplication.LaunchOptionsKey: Any]?) -> Bool {
        ChoiceCmp.shared.startChoice(pcode: "< YOUR PCODE >", delegate: self)
        return true
    }
}
func didReceiveIABVendorConsent(tcData: TCData, updated:Bool) {  }
func didRecieveNonIABVendorConsent(nonIabData: NonIABData, updated:Bool) {  }
func didReceiveAdditionalConsent(acData: ACData, updated:Bool) {}
func didReceiveCCPAConsent(string: String) { }
func cmpDidError(error: Error) { }
While the startChoice method is designed to display the popup when necessary, and this additional method is specifically used for the on-demand showing of the CMP dialog:
To open the CMP, call:
ChoiceCmp.shared.forceDisplayUI()
InMobiCMP in your App class.
import InMobiCMP
Initialize InMobi CMP: Call the method ChoiceCmp.shared.startChoice within the active state of the onChange notification of the main WindowGroup. This method anticipates the following:
If shouldDisplayIDFA is true, it is imperative to add the NSUserTrackingUsageDescription key to your info.plist. Provide a clear description of how your app will utilize this value.
import SwiftUI
import InMobiCMP

@main
struct ChoiceSwiftUIApp: App {
    @Environment(\.scenePhase) private var scenePhase
    var body: some Scene {
        WindowGroup {
            ContentView()
        }.onChange(of: scenePhase) { newScenePhase in
            if newScenePhase == .active {
ChoiceCmp.shared.startChoice(pcode: "< YOUR PCODE >", delegate: ChoiceDelegate())
            }
        }
    }
}
ChoiceCmpDelegate protocol.
import SwiftUI
import InMobiCMP

@main
struct ChoiceSwiftUIApp: App {
    @Environment(\.scenePhase) private var scenePhase
    var delegate = ChoiceDelegate()
    var body: some Scene {
        WindowGroup {
            ContentView()
        }.onChange(of: scenePhase) { newScenePhase in
            if newScenePhase == .active { ChoiceCmp.shared.startChoice(pcode: "< YOUR PCODE >", delegate: delegate)
            }
        }
    }
}
class ChoiceDelegate: NSObject, ChoiceCmpDelegate, CCPADelegate {
    func cmpDidLoad(info: InMobiCMP.PingResponse) {
    }
    func cmpDidShow(info: InMobiCMP.PingResponse) {
    }
    func didReceiveIABVendorConsent(tcData: InMobiCMP.TCData, updated: Bool) {
        //Use TCData to know the consent information related to IAB vendors
    }
    func didReceiveNonIABVendorConsent(nonIabData: InMobiCMP.NonIABData, updated: Bool) {
        //Use NonIABData to know the consent information related to Non-IAB vendors
    }
    func didReceiveAdditionalConsent(acData: InMobiCMP.ACData, updated: Bool) {
        //Use ACData to know the consent information related to Google vendors
    }
    func cmpDidError(error: Error) {
    }
    func didReceiveCCPAConsent(string: String) {
    }
}
The ChoiceCmp maintains a weak reference to the delegate object to prevent retain cycles. Ensure that you retain a reference to the delegate in your code to prevent it from being deallocated.
shouldDisplayIDFA is true, it's recommended to include NSUserTrackingUsageDescription in your info.plist file. This communicates to users that your app requests their consent for tracking.
ChoiceCmp.shared.forceDisplayUI()
The startChoice method displays the popup automatically if necessary. The additional method is specifically designed for on-demand popup display.
For products utilizing React Native, it's worth noting that the InMobi CMP is fully compatible with Objective-C. Follow the instructions to outline the requirements for integrating the InMobi CMP with React Native:
UIApplicationDelegate header file (.h):
#import <InMobiCMP/InMobiCMP.h>
ChoiceCmpDelegate protocol, or create a separate delegate class.
@interface AppDelegate : UIResponder <UIApplicationDelegate, ChoiceCmpDelegate, CCPADelegate>
The InMobi CMP maintains a weak reference to the delegate object to prevent retain cycles. Ensure you retain a reference somewhere in your code to prevent it from being deallocated.
- (void)cmpDidErrorWithError:(NSError * _Nonnull)error {}
- (void)cmpDidLoadWithInfo:(PingResponse * _Nonnull)info {}
- (void)cmpDidShowWithInfo:(PingResponse * _Nonnull)info {}
- (void)didReceiveAdditionalConsentWithAcData:(ACData * _Nonnull)acData updated:(BOOL)updated {}
- (void)didReceiveIABVendorConsentWithTcData:(TCData * _Nonnull)tcData updated:(BOOL)updated {}
- (void)didReceiveNonIABVendorConsentWithNonIabData:(NonIABData * _Nonnull)nonIabData updated:(BOOL)updated {}
- (void)didReceiveCCPAConsent:(NSString * _Nonnull)string { }
UIApplication delegate's application:didFinishLaunchingWithOptions: method, insert the following code below any rootViewController initialization:
[[ChoiceCmp shared] startChoiceWithPcode:@"< YOUR PCODE >" delegate: self ccpaDelegate: self shouldDisplayIDFA:false];
shouldDisplayIDFA is true, you should include the NSUserTrackingUsageDescription in your info.plist file. This communicates to users that your app requests their consent for tracking.startChoice method displays the popup automatically if necessary. This additional method is only required for on-demand popup display. To open the CMP, call::
ChoiceCmp.forceDisplayUI()
At this stage, you have successfully integrated the SDK. The SDK will actively monitor lifecycle events to ensure that consent is consistently available. If, at any point, consent is not found, the CMP will promptly appear to request the user's consent. Each time a user is prompted, the associated callbacks will be triggered.
implement all three consent callbacks, even if you haven't configured all the consent features. This ensures comprehensive consent handling and minimizes the risk of overlooking any crucial aspects.
didReceiveIABVendorConsent callback is triggered upon obtaining user consent for IAB-compliant vendors. You can find a list of IAB-compliant vendors here. Ideally, IAB-compliant mobile frameworks will autonomously incorporate this consent and adjust their configuration accordingly. However, it's worth noting that not all frameworks are IAB-compliant. If you're uncertain, it's advisable to contact your vendor for clarification. In cases where the framework is not compliant, you'll be responsible for handling the consent process yourself. If the framework prescribes a setup method typically called in didFinishLaunchingWithOptions, ensure it is relocated here and executed after verifying the consent. For instance:
func didReceiveIABVendorConsent(tcData: TCData, updated: Bool) {
    // Use TCData to know the consent information related to IAB vendors

    // Use gdprApplies to check if the gdpr applies or not
    print(tcData.gdprApplies)

    // Use tcData.vendor.consents to checkout the vendor consents
    print(tcData.vendor.consents)
}
TCString can also be accessed directly from the UserDefaults using the key IABTCF_TCString.
didRecieveNonIABVendorConsent callback pertains to vendors configured in the Choice Portal and do not automatically validate consent. Here, consent is provided straightforwardly: either a blanket, yes or no. To verify consent, locate the specific vendor by their assigned ID in the CMP Portal using the following method:
func didReceiveNonIABVendorConsent(nonIabData: NonIABData, updated: Bool) {
    //Use NonIABData to know the consent information related to Non-IAB vendors

    // Use gdprApplies to check if the gdpr applies or not
    print(nonIabData.gdprApplies)

    // Use nonIabData.nonIabVendorConsents to checkout the vendor consents
    print(nonIabData.nonIabVendorConsents)

}
func didReceiveAdditionalConsent(acData: ACData, updated: Bool) {
    //Use ACData to know the consent information related to Google vendors

    // Use gdprApplies to check if the gdpr applies or not
    print(acData.gdprApplies)

    // Use acData.additionalVendorConsent to checkout the vendor consents
    print(acData.additionalVendorConsent)

 }
While likely not essential for typical usage, additional callbacks are available for debugging or advanced scenarios. One such callback is cmpDidError, which triggers whenever the CMP exits unexpectedly and fails to collect consent.
After successfully initializing the SDK, you can present the CCPA screen by invoking the following method:
[[ChoiceCmp shared] showCCPAWithCcpaDelegate:self];
ChoiceCmp.shared.showCCPA(ccpaDelegate: self)
To allow users to opt out of selling their data, you must incorporate a UI control into your application with the text "Do not sell my data". This control should trigger an action that launches the CCPA UI.
To receive a callback for the CCPA consent string once the user taps the confirm button, implement the CCPADelegate protocol. You can access the obtained string through UserDefaults using the key IABUSPrivacy_String.
- (void)didReceiveCCPAConsentWithString:(NSString *)string {
    // Use the string for CCPA consent
}
func didReceiveCCPAConsent(string: String) {
    // Use the string for CCPA consent
}
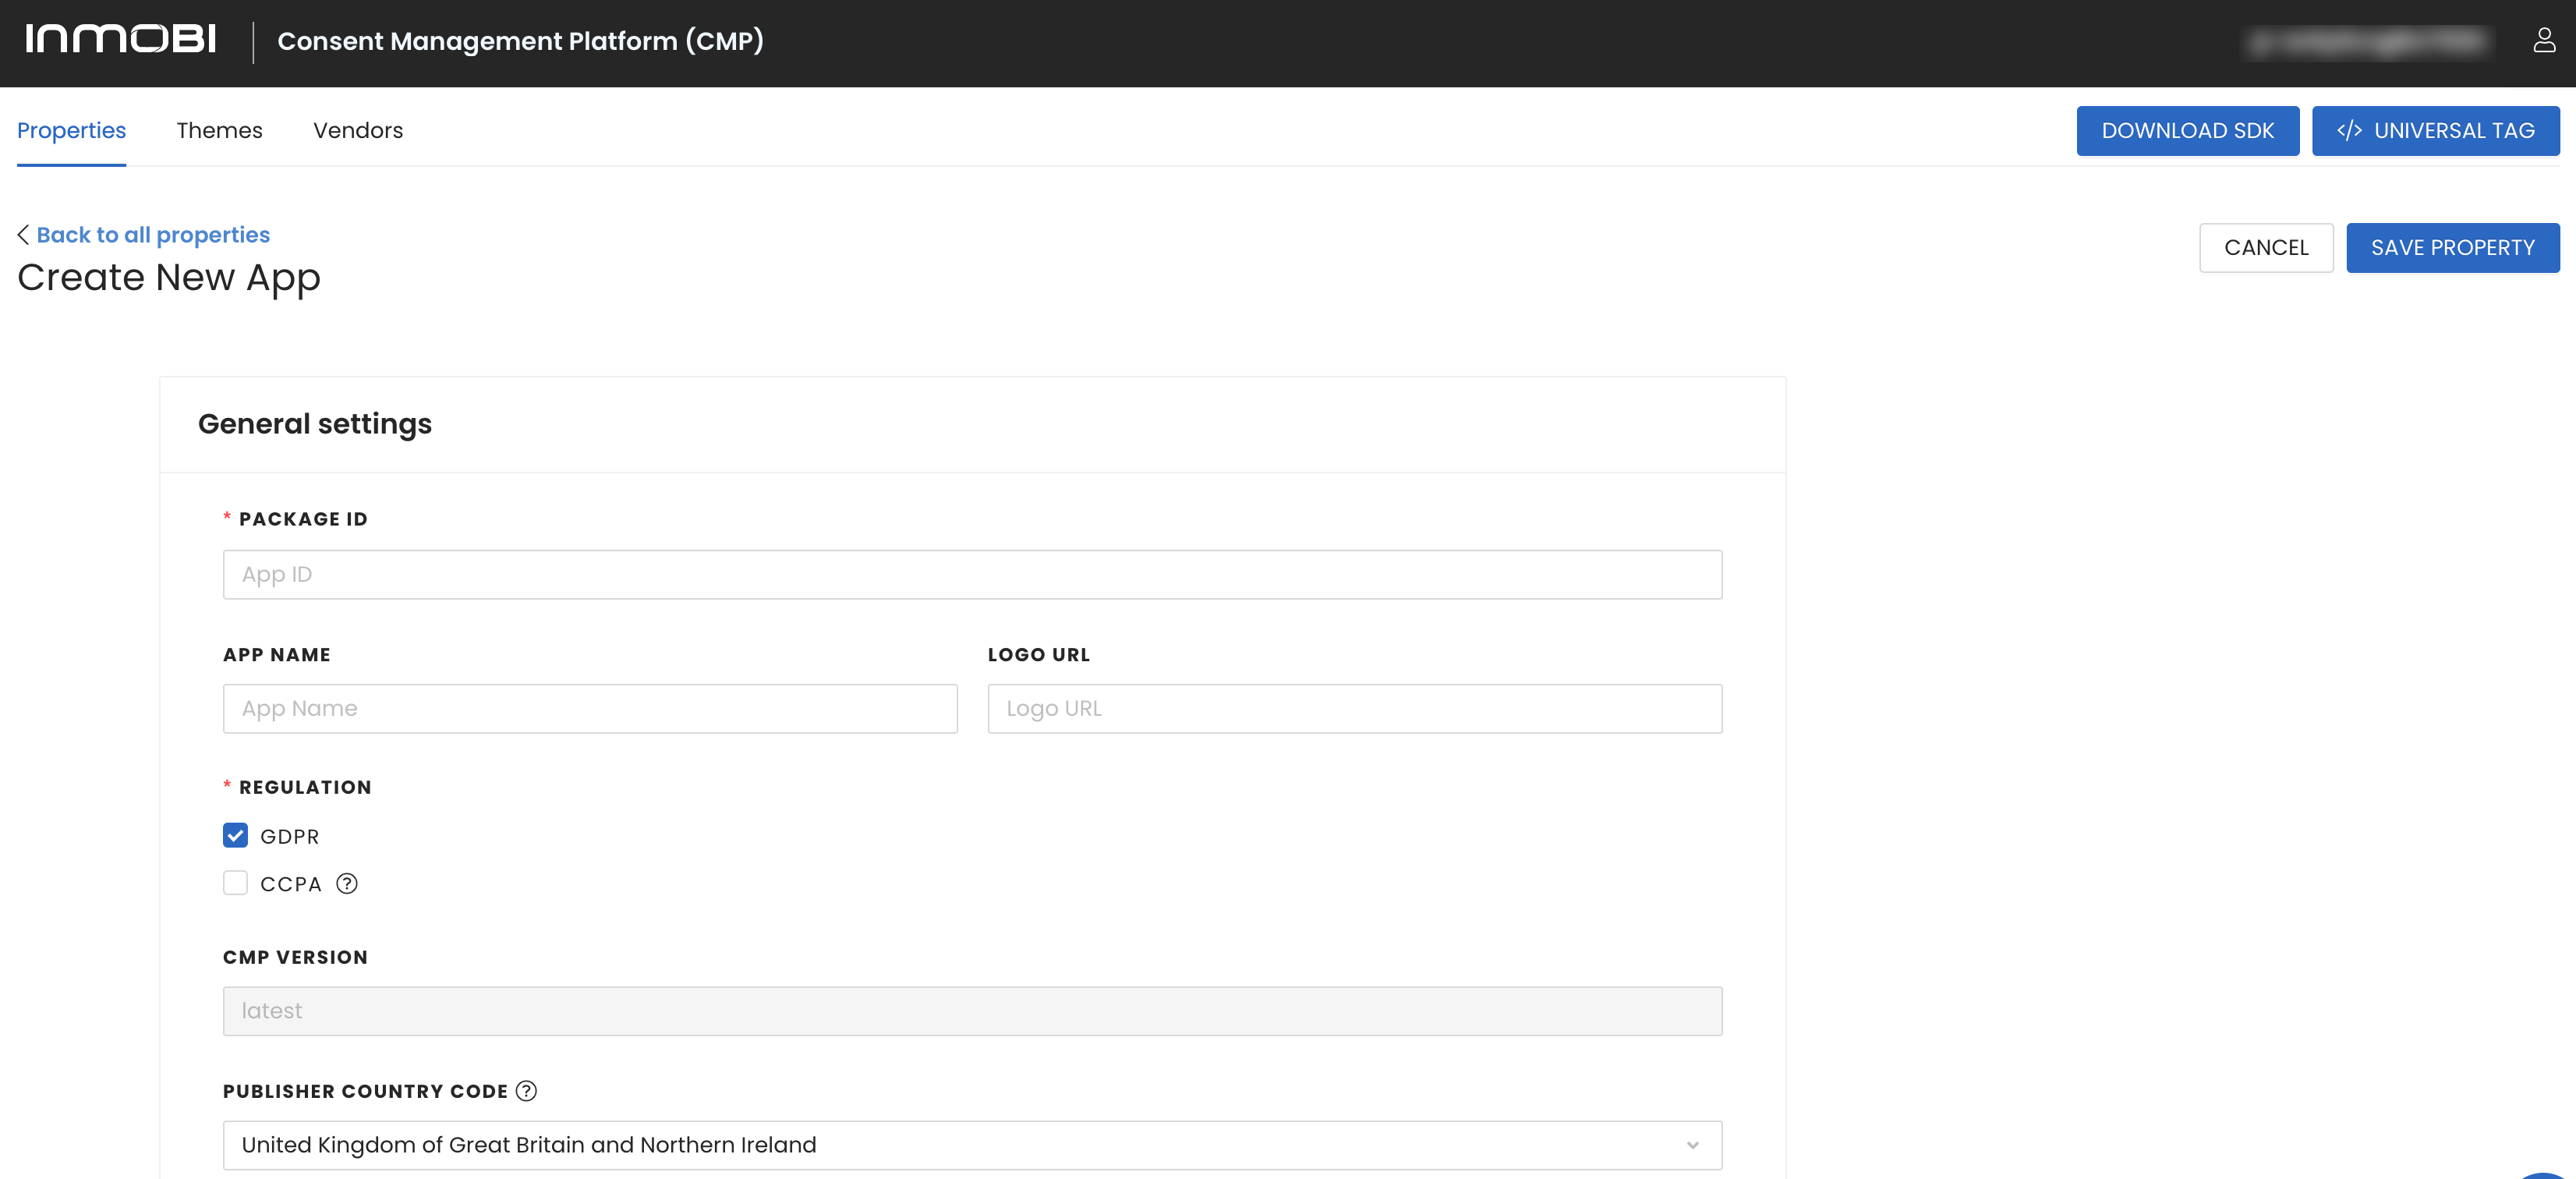
To initialize the SDK, you must provide your account's p-code for proper identification. After you log in to the InMobi CMP portal, you can see the p-code at the top right corner of the screen. However, as shown below, you must omit the initial two characters ("p-") when copying the code for use elsewhere.
The CMP provides an option to seamlessly integrate the new native IDFA permission popup (ATTrackingManager), provided the user has been granted permission for the CMP purposes. Presenting the popup right after the CMP offers users more context about the request, potentially leading to higher acceptance rates.

The popup will be triggered if GDPR applies and consent has been obtained, or if GDPR is explicitly stated not to apply.
If your app and associated vendors will never utilize the IDFA, or if you intend to display this popup at a different time, set this option to false.
However, if you choose to set this option to true, ensure you provide a usage description in your Info.plist. To do this, add a new key named NSUserTrackingUsageDescription and furnish it with a concise yet comprehensive description of how the IDFA will be utilized. For instance, "We use this value to help serve you relevant advertising".
By installing this SDK update, you agree that your Children Privacy Compliance setting remains accurate or that you will update that setting, whenever there is a change in your app's audience. You may update the app's Children Privacy Compliance settings at https://publisher.inmobi.com/my-inventory/app-and-placements.
 Support Center


