Integrating and monetizing with InMobi SDK is easy. InMobi supports both manual download and mavenCentral to integrate the Android SDK.
If you are using Gradle to build your Android applications, you can pull the latest version of the SDK from mavenCentral as described below:
Include mavenCentral in your top-level build.gradle file:
allprojects {
    repositories {
        mavenCentral()
    }
}
Add the following line to the dependencies element in your application module’s build.gradle.
implementation 'com.inmobi.monetization:inmobi-ads:10.1.3'
Alternatively, you can download the latest version of InMobi’s SDK here and copy the library to your application module’s libs/directory.
To add the library to your project’s dependencies, add this line to the dependencies element in your module’s build.gradle:
implementation fileTree(dir: 'libs', include: ['*.aar'])
The latest version of InMobi SDK supports Android 4.1 (API level 16) or higher.
To monetize with the InMobi SDK, you must add the following dependencies to your application module build.gradle:
The InMobi SDK for Android needs the Google Play Services library to enable better ad targeting via the Google Play Advertising ID. Additionally, the SDK also uses the Google Play Services for getting a location fix, should the user consent to collecting their location.
To add the Google Play Services client library to your application:
Add the following line to the application module’s dependency element.
implementation 'com.google.android.gms:play-services-ads-identifier:18.0.1'
implementation 'com.google.android.gms:play-services-location:21.0.1'//optional dependency for better targeting
Sync your Gradle project to ensure that the dependencies are included.
This is required to redirect the users to URLs outside InMobi WebView. To add the Chrome Custom library to your application:
Add the following line to the application module's dependency element in the Gradle build script:
implementation 'androidx.browser:browser:1.4.0'
Sync your Gradle project to ensure dependencies are included.
Failure to include Chrome Custom Tab dependency in your application gradle scripts will cause ad requests to fail, thus affecting the monetization of your app with the InMobi SDK.
The InMobi SDK for Android uses the popular Picasso library for loading ad assets. To add the Picasso library to your application:
Add the following line to the application module’s dependency element in the Gradle build script:
implementation 'com.squareup.picasso:picasso:2.8'
Failure to include Picasso dependency in your application gradle scripts will cause interstitial ad requests to fail, thus affecting the monetization of your app with the InMobi SDK.
For supporting paged scroll of a deck of images or ads, you must use support-v4 library
To add the Support Library to your application, add the following line to the application module’s dependency element in the Gradle build script.
implementation 'androidx.viewpager:viewpager:1.0.0'
For supporting free scroll of a deck of images or ads, you must use RecyclerView.
To add the RecyclerView library to your application, add the following line to the application module’s dependency element in the Gradle build script.
implementation 'androidx.recyclerview:recyclerview:1.2.1'
Failure to include RecyclerView dependency in your application gradle scripts will cause interstitial ad requests to fail, thus affecting the monetization of your app with the InMobi SDK.
AppSet ID helps to track users uniquely per device and per publisher. To support retrieving of AppSet ID in your application.
Add the following line to the application module's dependency element in the Gradle build script:
implementation 'com.google.android.gms:play-services-appset:16.0.2' //optional dependency for better targeting
implementation 'com.google.android.gms:play-services-tasks:18.0.2' //optional dependency for better targeting
At times, including the InMobi SDK may cause the 64K limit on methods that can be packaged in an Android dex file to be breached. This can happen if, for example, your app packs a lot of features for your users and includes substantive code to realize this.
If this happens, you can use the multidex support library to enable building your app correctly. To do this:
Modify the defaultConfig to mark your application as multidex enabled:
defaultConfig {
    ...
    multiDexEnabled true // add this to enable multi-dex
}
Add the following line to the dependencies element in your application module’s build script.
implementation 'androidx.multidex:multidex:2.0.1'
Now that you have added the dependencies, your app's build.gradle at this point will look like as shown below:
dependencies {
    implementation 'com.google.android.gms:play-services-ads-identifier:18.0.1'
    implementation 'com.google.android.gms:play-services-location:21.0.1'//optional dependency for better targeting
    implementation 'androidx.browser:browser:1.4.0'
    implementation 'com.squareup.picasso:picasso:2.8'
    implementation 'androidx.recyclerview:recyclerview:1.2.1'
    implementation 'com.google.android.gms:play-services-appset:16.0.2' //optional dependency for better targeting
    implementation 'com.google.android.gms:play-services-tasks:18.0.2' //optional dependency for better targeting
}
It is highly recommended that you include ACCESS_FINE_LOCATION to enable better ad targeting. This is not mandatory permission; however, including it will enable accurate ad targeting.
<uses-permission android:name="android.permission.ACCESS_FINE_LOCATION" />
For further improved targeting, you can add the ACCESS_WIFI_STATE and CHANGE_WIFI_STATE permissions to the manifest.
<uses-permission android:name="android.permission.ACCESS_WIFI_STATE" />
<uses-permission android:name="android.permission.CHANGE_WIFI_STATE" />
Google now requires app developers that use the Android Advertising ID (AAID) to declare the AD_ID permission when their apps target Android 13 or above. You can declare the AD_ID permission to the manifest as follow:
<uses-permission android:name="com.google.android.gms.permission.AD_ID"/>
Hardware acceleration allows you to display HTML5 video ads. To do this, add hardwareAccelerated:true element to the application tag.
<application
    ...
    android:hardwareAccelerated="true"
    ...
>
Proguarding helps to remove unused symbols and reduce the final application footprint. The following proguard directives should be added to your application’s proguard configuration file:
-keepattributes SourceFile,LineNumberTable
-keep class com.inmobi.** { *; }
-keep public class com.google.android.gms.**
-dontwarn com.google.android.gms.**
-dontwarn com.squareup.picasso.**
-keep class com.google.android.gms.ads.identifier.AdvertisingIdClient{
     public *;
}
-keep class com.google.android.gms.ads.identifier.AdvertisingIdClient$Info{
     public *;
}
# skip the Picasso library classes
-keep class com.squareup.picasso.** {*;}
-dontwarn com.squareup.okhttp.**
# skip Moat classes
-keep class com.moat.** {*;}
-dontwarn com.moat.**
# skip IAB classes
-keep class com.iab.** {*;}
-dontwarn com.iab.**
Let’s pause for some checks before we begin initializing the SDK:
InMobi SDK is compatible with AndroidX (JetPack) library. In case your app uses the AndroidX library, InMobi SDK 9.1.7 or later is compliant with AndroidX. Enabling the jetifier is not required for InMobi SDK. Check for any other dependencies requiring the enablement of the Jetifier before removing it. However, if you are using any version below 9.1.7, follow the standard guidelines by Google for migration by adding both the flags in build file.
android.useAndroidX=true
android.enableJetifier=true
It is highly recommended to upgrade Android Gradle plugin version to 4.1 or greater to avoid known issues in the jetifier which is fixed in the latest Gradle plugin version. To upgrade Android gradle plugin version please refer to Android developer documentation.
Initialize the SDK using the init API by passing the context, InMobi account ID and the SdkInitialization listener in your launcher activity. Publishers can now check whether the init is successful or not with the completion callback. On completion of Init, any integration of ads should be taken care of. In case the listener is null, the SDK will start working with default settings and eventually gets updated settings later in the lifecycle of the app.
You must call this method on the UI thread. Not doing so will cause the initialization to fail and affect your application’s ability to monetize with InMobi.
JSONObject consentObject = new JSONObject();
try {
    // Provide correct consent value to sdk which is obtained by User
    consentObject.put(InMobiSdk.IM_GDPR_CONSENT_AVAILABLE, true);
    // Provide 0 if GDPR is not applicable and 1 if applicable
    consentObject.put("gdpr", "0");
    // Provide user consent in IAB format
    consentObject.put(InMobiSdk.IM_GDPR_CONSENT_IAB, “ << consent in IAB format >> ”);
} catch (JSONException e) {
    e.printStackTrace();
}
InMobiSdk.init(this, "Insert InMobi Account ID here", consentObject, new SdkInitializationListener() {
    @Override
    public void onInitializationComplete(@Nullable Error error) {
        if (null != error) {
            Log.e(TAG, "InMobi Init failed -" + error.getMessage());
        } else {
            Log.d(TAG, "InMobi Init Successful");
        }
    }
});
val consentObject = JSONObject()
try {
   // Provide correct consent value to sdk which is obtained by User
   consentObject.put(InMobiSdk.IM_GDPR_CONSENT_AVAILABLE, true)
   // Provide 0 if GDPR is not applicable and 1 if applicable
   consentObject.put("gdpr", "0")
   // Provide user consent in IAB format
   consentObject.put(InMobiSdk.IM_GDPR_CONSENT_IAB, “ << consent in IAB format >> ”)
} catch (e:JSONException) {
   e.printStackTrace()
}
InMobiSdk.init(this, "Insert InMobi Account ID here", consentObject,  SdkInitializationListener() {
   @Override
   fun onInitializationComplete(error : Error?) {
       if (null != error) {
           Log.e(TAG, "InMobi Init failed -" + error.getMessage())
       } else {
           Log.d(TAG, "InMobi Init Successful")
       }
   }
})
Let’s understand a few things here before you proceed to the next step:
What is a consentObject? A consentObject is a JSONObject representation of all kind of consent provided by the publisher to the SDK. The key is mandatory if you wish to monetize traffic from European Economic Area; InMobi relies on publishers to obtain user consent to comply with the regulations. You can read further on GDPR regulations here.
| Key | Type | Inference |
| gdpr_consent | String | A consent string is a series of numbers, which identifies the consent status of an Ad tech Vendor.
The string must follow the IAB contracts as mentioned here. The key, gdpr_consent can be accessed via string constant IM_GDPR_CONSENT_IAB. |
| gdpr_consent_available | boolean |
true: Publisher has provided consent to collect and use user’s data. false: - Publisher has not provided consent to collect and use user’s data. Any value other than “true” and “false” is invalid and will be treated as value not provided by publisher, i.e. empty value. The key gdpr_consent_available can be accessed via string constant IM_GDPR_CONSENT_AVAILABLE. |
| gdpr | String | Whether or not the request is subjected to GDPR regulations, deviation from the set values (0 = No, 1 = Yes ), indicate an unknown entity. |
consentObject in every session. The SDK does not persist consent, it only keeps the consentObject in memory. If the app is relaunched or crashes - SDK will lose the consentObject.Within a session, you can update the consent this way:
InMobiSdk.updateGDPRConsent(JSONObject consentObject)
InMobiSdk.updateGDPRConsent(consentObject:JSONObject)
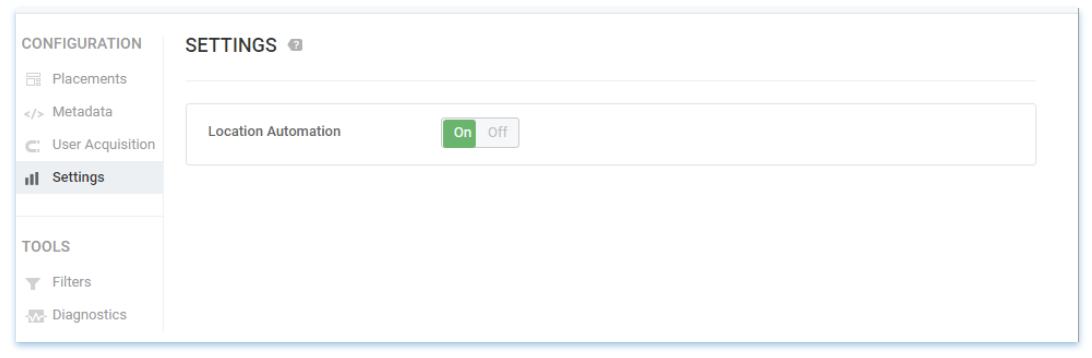
If your app collects location from the user, we recommend passing it up, as impressions with location signal have higher revenue potential. InMobi SDK will automatically pass the location signals if available in the app. If you use location in your app but would like to disable passing location signals to InMobi, then TURN OFF the “Location Automation” for your property on the InMobi dashboard.
Otherwise, you can pass the location signals as follows:
InMobiSdk.setLocation(locationObj);
InMobiSdk.setLocation(locationObj)
Alternatively, you can set the city, state, and country as well:
InMobiSdk.setLocationWithCityStateCountry(“city”,“state”,“country”);
InMobiSdk.setLocationWithCityStateCountry(“city”,“state”,“country”)
InMobi relies on the publishers to obtain explicit consent from users for continuing business activities in the EU as per GDPR. You can supply the InMobi SDK with the gender and age as follows:
InMobiSdk.setGender(InMobiSdk.Gender.MALE); // or InMobiSdk.Gender.FEMALE
InMobiSdk.setAge(age);
InMobiSdk.setAgeGroup(InMobiSdk.AgeGroup.BELOW_18);
   // other enums: BETWEEN_18_AND_20, BETWEEN_21_AND_24, BETWEEN_25_AND_34
   // BETWEEN_35_AND_5, ABOVE_55
InMobiSdk.setGender(InMobiSdk.Gender.MALE)  // or InMobiSdk.Gender.FEMALE
InMobiSdk.setAge(age)
InMobiSdk.setAgeGroup(InMobiSdk.AgeGroup.BELOW_18)
Passing location signals helps better ad targeting and ensures the ads served on your app are contextual and highly relevant to your users.
We recommended using age restriction information as well to comply with policies such as the data practices for Google’s Family Apps. You must determine the definition of age restriction depending on the user’s geographic data location. If the value is passed as True, the InMobi SDK will not transmit device identifiers such as (“AAID” in Android & “IDFA” in iOS). Note that the default value will be False.
InMobiSdk.setIsAgeRestricted(false) // possible value are true, false;
InMobiSdk.setIsAgeRestricted(false) // possible value are true, false
For app developers using the Android Advertising ID, you must declare AD_ID permission when your apps target Android 13 or above, as per Google's announcement. If the AD_ID permission is not declared, the system shows a string of zeros.
The InMobi SDK supports the AD_ID permission starting from version 10.0.5. For targeting Android 13 and above, you can declare the AD_ID permission in the manifest file as follows:
<uses-permission android:name="com.google.android.gms.permission.AD_ID"/>
You are all set now! Now let’s look at how you can set up different ad formats and begin monetizing. Ready?
By installing this SDK update, you agree that your Children Privacy Compliance setting remains accurate or that you will update that setting, whenever there is a change in your app's audience. You may update the app's Children Privacy Compliance settings at https://publisher.inmobi.com/my-inventory/app-and-placements.
 Support Center


